🚀 First steps
The main menu
When the game starts you have four buttons: NEW GAME, LOAD GAME (greyed out if there are no saved games yet), OPTIONS and CREDITS, plus QUIT and a gear in the bottom-right corner that also opens the options. In the free version you'll also see the REMOVE ADS — PREMIUM €9.99 button. And if the app closed in the middle of a live match, the menu offers CONTINUE MATCH IN PROGRESS to pick it up right where it left off.
New game
The new game screen generates a brand-new full world (13 countries, 29 leagues, around 570 clubs) every time you enter; on mobile it takes a couple of seconds, with a "generating" notice while it works.
- COUNTRY: switch with the ◀ ▶ arrows or tap the country name to open the world map and choose at a glance. The stars next to the name show the league's strength: 5 stars means a top league with higher quality and more money; 1 star, a modest league with small budgets but beatable rivals.
- IMPORT DATA…: opens a menu with FROM URL (paste a direct link to the .json, for example a raw GitHub link; the last URL used is remembered) and FROM FILE (the system file picker, on Android too). The dataset is validated before it installs: if it fails, you're shown the first reasons for the error and your previous dataset stays untouched. If it validates, it's applied to the leagues it covers (the v2 format supports several countries at once): clubs use their real names, crests are drawn with the real colours and a pattern close to the original crest, stadiums take on their real name and capacity, and players wear their real squad numbers if the dataset includes them. If the dataset declares its season (for example 2025 for 2025-26), the game starts in that year — in MANAGER and in PRO MANAGER — instead of the game's default year. A notice under the country confirms the imported data is active; with data installed you'll also see the REMOVE IMPORTED DATA option.
- DIFFICULTY: three levels, with a line under the buttons summing up the one selected. What each of them really changes:
- EASY: 50% more starting cash, a 10-matchday grace period in the red before the board steps in, +5% performance for your players, loans at 5%, fewer negative events, a more forgiving board objective, event timers 30% longer, no sacking in your first season and a timid transfer-market AI that never fights you for targets.
- MEDIUM: the reference experience — normal cash, a 6-matchday grace period, no performance bonus, loans at 10% and the sack possible from year one.
- HARD: only 60% of the starting cash, a 4-matchday grace period, −3% performance, loans at 15%, more negative events, a demanding board objective, timers 20% shorter and a transfer-market AI 40% more aggressive that can even steal signings you're halfway through negotiating.
- GAME MODE: chosen in a prompt the moment you tap NEW GAME, because it changes how you start. MANAGER plays with assists (auto-filling the XI and assistant suggestions), the dugout is yours for as long as the board doesn't sack you, and you freely pick your club from the list. PRO MANAGER is Career mode: you don't pick a club — a manager with no track record starts wherever the phone rings, so the screen shows up to 4 job offers from modest clubs in the country and you SIGN one to get started. From there: a 2-season contract, at the end of each one the board decides whether to renew you and for how many years, other clubs make you offers every summer based on your reputation, and if your contract expires without a renewal you're out on the street with whatever offers are on the table. It also switches off every assist and cuts event timers by an extra 30%. It's independent of difficulty: you can be PRO on EASY or classic on HARD.
- MANAGER NAME: type your own; leave it blank and you'll go down as "Manager".
- Your team: the table on the right lists every club in the country with its division (colour-coded by tier) and its average level with a bar. Tap a club and hit START GAME.
The 6-step tutorial
The first time you reach your office, a short tutorial walks you through the essentials in 6 steps: the dashboard, the LINE-UP and the XI indicator (green when the team is ready), TACTICS and the familiarity bonus, the ADVANCE MATCHDAY button, arcade events and the live match. You can leave at any time with SKIP TUTORIAL; once finished or skipped, it never comes back.
Saving, loading and autosave
The game autosaves every matchday to the AUTOSAVE slot (it can be turned off in Options). You also get 6 manual slots: tap SAVE in the bottom bar of the dashboard, next to LOAD and NEWS. On the load screen each slot shows club, season, manager, difficulty and date, with LOAD and DELETE buttons (with confirmation). Finished careers are marked as such — browsable, but no longer playable — and saves from old versions are flagged as incompatible.
Options
Reachable from the main menu and from inside a game. Everything you touch is saved instantly.
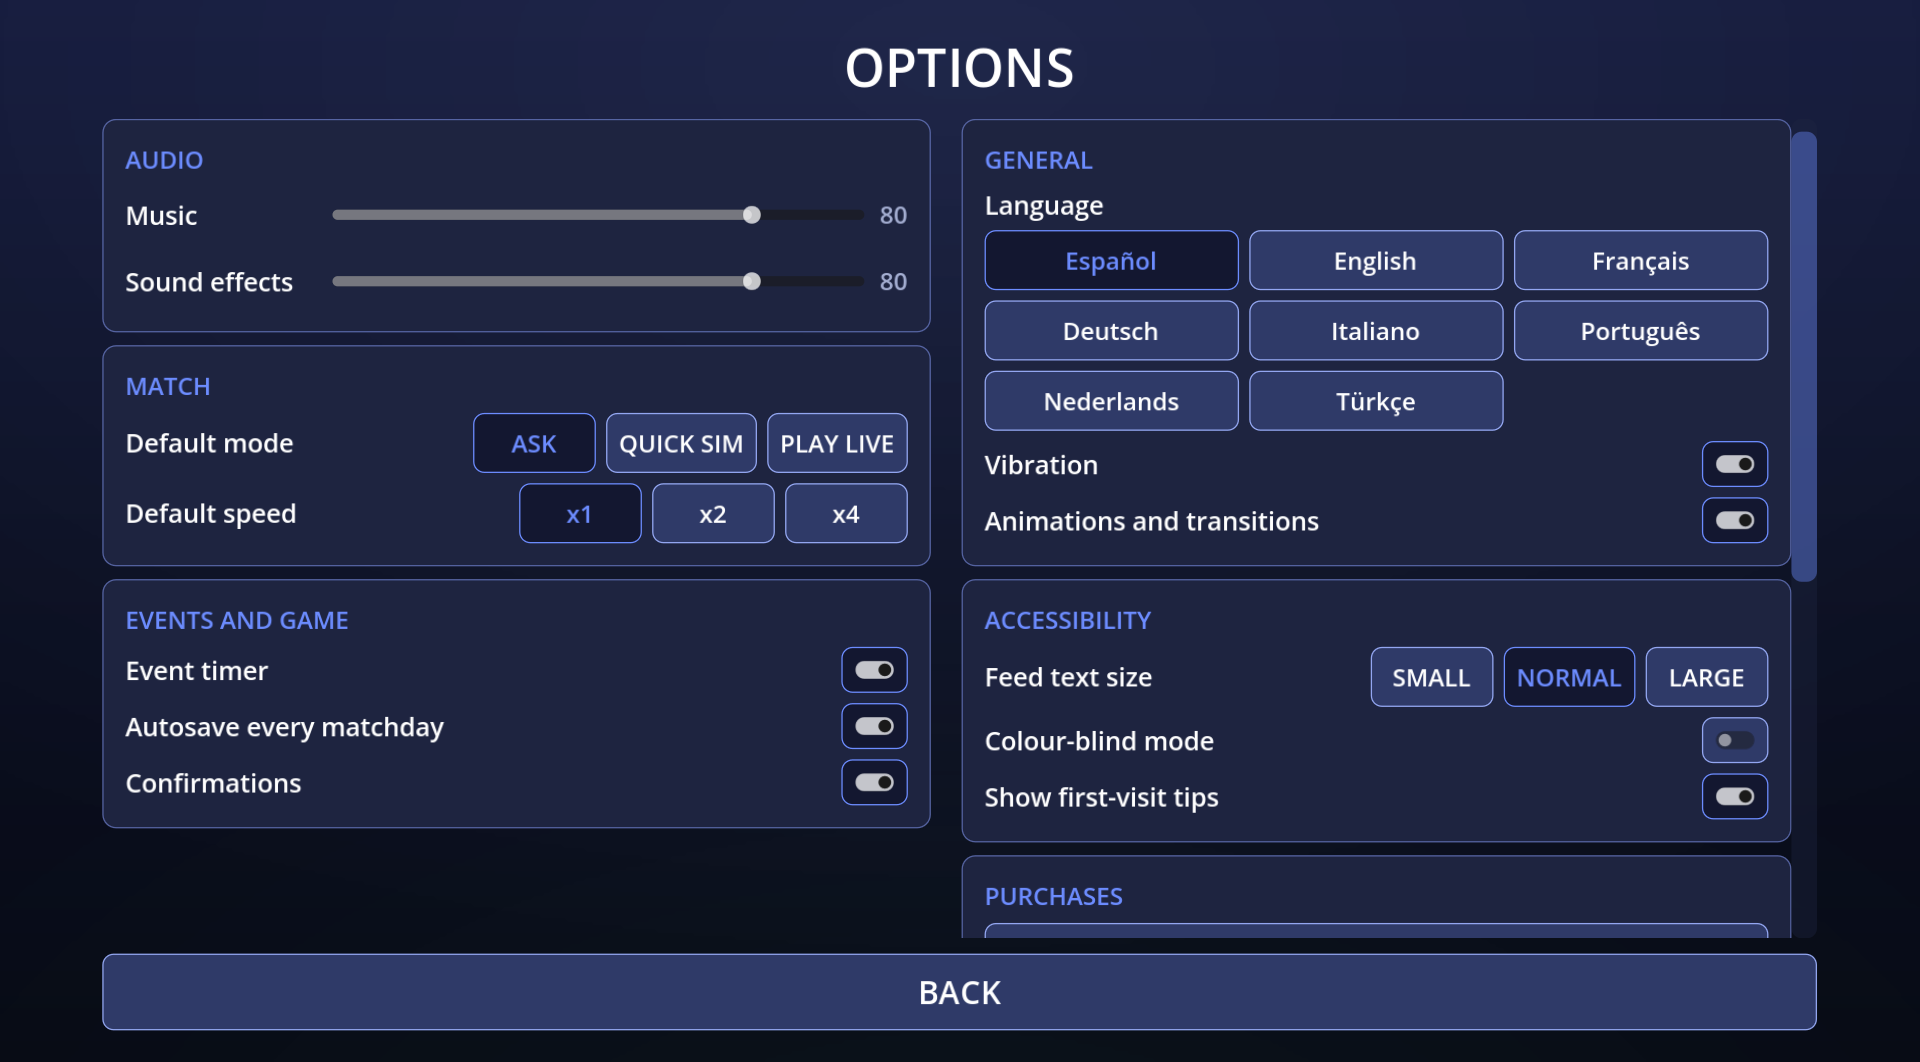
- AUDIO: MUSIC and SOUND EFFECTS sliders (0–100; at 0 it's total silence).
- MATCH: DEFAULT MODE — ASK (every matchday you choose between watching the match or simulating it, with a "remember my choice" checkbox that locks your answer in as the default mode), QUICK (always simulates) or LIVE (always watch). DEFAULT SPEED for the live match: x1, x2 or x4.
- EVENTS & GAMEPLAY: EVENT TIMER (turn it off to decide without a countdown), AUTOSAVE EVERY MATCHDAY and CONFIRMATIONS. The first two also apply to the game in progress.
- GENERAL: LANGUAGE with 8 options — Español, English, Français, Deutsch, Italiano, Português, Nederlands and Türkçe. On first launch the system language is used if supported (English otherwise), and any change applies instantly. Also VIBRATION and ANIMATIONS AND TRANSITIONS.
- ACCESSIBILITY: FEED TEXT SIZE (small, normal or large), COLOUR-BLIND MODE (changes the position colours) and SHOW FIRST-VISIT TIPS.
- PURCHASES: REMOVE ADS — PREMIUM €9.99 (a one-time purchase, no gameplay advantages) and RESTORE PURCHASES, which checks your purchase on Google Play after a reinstall. If you're already premium, you'll see PREMIUM ACTIVE here.
- DATA: DELETE SAVED GAMES wipes every slot, autosave included, with double confirmation; RESET SETTINGS returns every option to its default value, system language included.
- ABOUT: CREDITS and the game's version number.
🗓️ Your day-to-day: the dashboard
The dashboard is your office: everything starts and ends here. The header shows your crest, the club's name, your manager name and the current week's label (SEASON — MATCHDAY, PRE-SEASON or whichever cup round is up); the gear in the corner opens OPTIONS. Below it, the status bar sums everything up at a glance: NEXT MATCH (matchday, opponent and whether you're playing at HOME or AWAY), CASH (in red if negative), your league POSITION, your line-up's LEVEL and the state of your XI: XI READY in green or CHECK YOUR XI in red.
The centre is a grid of 12 cards, one per module: LINE-UP, TACTICS, SQUAD, OPPONENT, TABLE, RESULTS, FIXTURES, TRANSFERS, FINANCES, STADIUM, STAFF and BOARD. The bottom bar is home to EXIT TO MENU, SAVE (6 manual slots), LOAD, NEWS — with an unread counter that lights up when there's something new — and the big one: ADVANCE MATCHDAY. Your first game opens with a 6-step tutorial that walks through all of this; you can skip it and it won't return.
ADVANCE MATCHDAY
Tapping it can set off several things, in this order: an arcade event may pop up that has to be resolved first; if it's a league matchday and your XI isn't valid, a prompt offers AUTO-FILL AND PLAY or GO TO LINE-UP; and finally the LEAGUE MATCH dialog asks how you want to play it: PLAY LIVE or QUICK SIM. Tick the REMEMBER MY CHOICE box and that option becomes your default mode: the dialog stops appearing (change it whenever you like in Options). While the entire world simulates — every league and cup in every country — you'll see the SIMULATING MATCHDAY notice. If your club doesn't play that week, it passes with the notice "No match this matchday: the club rests." (you can silence it by turning off confirmations in Options). What's more, the important answers come looking for you: back on the dashboard, a popup rounds up completed signings, rejected offers, targets the AI has stolen from you, resolved renewals and announced retirements.
FIXTURES
Shows your division matchday by matchday: browse with the arrows to see every pairing, with the score if already played and your match highlighted. It opens on the matchday of your next match. The season weaves in several types of week — pre-season and friendlies (with the summer window open), league matchdays, NAT. CUP, CONT. CUP and CHAMP. CUP rounds, the winter window around the halfway mark and rest weeks when your league isn't playing — and the label in the dashboard header always tells you which one you're on.
NEWS
A chronological feed with the newest at the top and category filters: ALL, CLUB (injuries and recoveries, suspensions, final-year contracts, academy, stadium works, retirements), TRANSFERS (offers, counter-offers, signings, stolen targets, pre-contracts, rumours with a reliability percentage, window opening and closing), COMPETITION (your results, derbies, routs, the league leader), BOARD (expired contracts, patience warnings) and EVENTS. The last 200 are kept. Opening the screen marks everything as read; many stories carry the VIEW button, which jumps straight to the player, the offers, the board, the scout or the stadium. The feed's text size is adjusted in Options.
RESULTS and TABLE
RESULTS has one tab per division in your country (the groups of the Spanish 3rd tier appear as separate tabs) plus NAT. CUP, CONT. CUP and CHAMP. CUP. In the league the arrows switch matchdays; in the cups, rounds (from the Preliminary to the Final). Drawn cup ties show the shoot-out: "(4 - 2 on penalties)"; future rounds read "Round not drawn yet".
TABLE opens on your league, with your row highlighted and columns for played, wins, draws, losses, goals and points. The position cell carries a colour band by zone, with a legend: green = Champions Cup (in the top flight) or automatic promotion, purple = promotion playoff, red = relegation — always with the real quotas of each country and division. A tap on any row opens that club's profile (the OPPONENT screen). The TOP SCORERS side panel lists the league's leading marksmen with their club; yours are highlighted.
STATISTICS and WORLD LEAGUES
STATISTICS (entered from SQUAD) sums up your squad's league season, sorted by goals: matches played, goals, yellows and reds for every player. And from TRANSFERS, WORLD LEAGUES lets you snoop around any country: arrows to switch country (with its league-strength stars), a tap on the name to open the world map and jump straight there, a list of clubs with their average level and, alongside it, the full squad of the selected club. If you head off to a player's profile and come back, the screen remembers where you were.
📋 Squad and tactics
Squad
The SQUAD screen is a sortable table with all your players: squad number (NO.), PLAYER, position (POS., with its colour chip), contract (YRS., in "remaining/total" format — painted red with 1 year or less left: renew or sell before he walks for free), VALUE, WAGE, AGE and LEVEL. Tap a header to sort by that column; tap it again to reverse the order (your chosen order is remembered when you come back from a profile). An injured player carries a red cross next to his name; cards don't show here — they're handled in the Line-up. A single tap on any row opens his profile. The side panel sums up the team's AVERAGE LEVEL, WAGES and VALUE, and gives access to VIEW PROFILE and STATISTICS (top scorers and season numbers).
Player profile
The profile shows his main position and Secondary ones, age, level and three panels: GENERAL INFO (team, value, Release clause — 180% of his value —, wage and contract), ATTRIBUTES (Goalkeeping, Tackling, Passing, Dribbling, Finishing and Shooting) and CONDITION: TODAY'S LEVEL with the percentage each factor adds or takes away (form, morale, fatigue) plus his health. Growth potential exists but is hidden: nobody will tell you how far a kid can go.
The available actions depend on whose player he is:
- Yours: RENEW (only in the final contract year; the profile tells you what wage and years he wants, you make your offer with the selectors and he answers when you advance the matchday), change his NUMBER (a 1-to-99 grid, free numbers only), PUT UP FOR SALE / REMOVE FROM SALE and RELEASE (asks for a second confirming tap). If another club has signed him to a pre-contract or he's heading into retirement, the profile warns you: renewal is no longer possible.
- At another club: MAKE OFFER (fee + wage + years), REQUEST LOAN (insisting again the same matchday won't change the answer), ADD TO SHORTLIST (up to 20 tracked) and, if he's in his final year, PRE-CONTRACT (FREE) to bring him over at the end of the season with no fee. If his club has decided not to renew him, the profile flags it: he's a bargain at zero cost.
- Free agent: SIGN FOR FREE — you only negotiate wage and years.
Line-up
The LINE-UP screen lists three sections: STARTERS, SUBSTITUTES (SELECTED) (your 7 on the bench) and NOT SELECTED. Tap one player (marked with ») and then another, and they always swap: two starters trade positions, a starter and a bench player switch over, a selected and a non-selected player trade the bench spot, and two from the same section swap places in the list. The blue button on each row opens the profile. The bench is yours: the game only fills empty spots with the best players available — it never reorders your choices.
- The ! column pairs the icon with its number: an injury with the matchdays remaining ("3 MD"), a suspension with the matches ("2") and accumulated yellows ("×2"). The name is only painted red if the player is NOT available; with yellows he can still play.
- MOR. and FTG. are colour-coded so you can see at a glance who needs a rest.
- The POS. chip shows his true position; a ★ marks the versatile player — tap the chip and a notice lists his secondary positions without opening the profile.
- Among the starters, the colour of the effective LEVEL reflects how well he fits his slot: green in his natural position, amber in a secondary one (a small penalty), red out of position.
- The right-hand panel shows the LINE-UP LEVEL and the pitch with the formation drawn large.
If you advance the matchday with an invalid XI (injuries, suspensions, gaps), the game offers AUTO-FILL AND PLAY — it builds the best legal XI for you — or a jump to the line-up to fix it yourself.
Tactics
In TACTICS you choose from 8 FORMATIONS (3-3-4, 3-4-3, 3-5-2, 4-3-3, 4-4-2, 4-5-1, 5-3-2 and 5-4-1; when you switch, players reposition themselves) and adjust four sliders from 0 to 100%: Aggression (more ball-winning, more cards), Pressing (smothers the opponent but tires your own players), Possession and Counter-attack — push possession and counter-attack both above 70 and a warning reminds you they get in each other's way: pick a plan. Rounding off the panel are MARKING (MAN-TO-MAN or ZONAL) and DISTRIBUTION (LONG BALL or SHORT PASS). The LINE-UP LEVEL recalculates live with every change, and below it sits Tactical familiarity: every change of shape costs you a few matchdays until the team settles into it, so don't switch formation every week.
Opponent
OPPONENT shows you your next rival's probable XI (or that of whichever club you tapped in the table) with each starter's position, name, morale and level, plus their formation drawn on the pitch. The team level and attribute averages only appear with a technical director on the payroll; without him you'll see "?" and "—". From here you can jump to TACTICS to tweak your plan while the opponent is fresh in your mind: when you come back, you're still looking at the same team.
💰 The transfer market
The market opens twice a season: the summer window (all of pre-season, up to and including league matchday 1) and the winter window (league matchdays 23 to 27). Outside a window you can only browse: when it closes, every pending transfer negotiation expires. Renewing, signing pre-contracts and picking up free agents works all year round: negotiating isn't transferring.
The TRANSFERS hub
The TRANSFERS screen shows the worldwide PLAYERS FOR SALE shop window (or the FREE AGENTS, via the VIEW FREE AGENTS button) and the side menu: WORLD LEAGUES (browse any league and squad; tap the country to open the map), SEARCH, SCOUT, SHORTLIST, OFFERS and INS AND OUTS. In every table, a tap on a row opens the player's profile — which is where the negotiating happens.
Search
Filter by position (GK/DF/MF/FW), level bands (40-49 up to 90+), maximum age (45/30/25/21), maximum value (€1M to €50M), Final contract year and Free agents only. It returns up to 50 results, but only from discovered countries: your own plus wherever your scout has searched. Filters are remembered when you come back from a profile.
Buying: offer, counter-offer and the clause
From the profile, MAKE OFFER: a fee for the club + wage and years (1-5) for the player. You can have up to 5 offers in progress and only one per player (re-bidding replaces the previous one). The answer arrives when you advance the matchday; with no reply, the offer expires after 2 matchdays.
- The club accepts if you pay at least 110% of the player's value (85% is enough if he's up for sale).
- Offer at least 70% and it will usually counter-offer, asking for 125% of his value. You can ACCEPT or WITHDRAW.
- The release clause (180% of his value, visible on the profile) forces the sale: pay it and no counter-offer or refusal is possible, and no counter-offer can ever ask for more than the clause.
- Even if the club accepts, the player decides: he wants a pay rise (10% or more) and won't step down to a club of much lower standing.
- Rejection reasons, visible in OFFERS > INCOMING: the club won't sell (a low offer, or selling would leave their squad threadbare), the player doesn't want to go, retiring at the end of the season and another club beat you to him.
Selling and releasing
PUT UP FOR SALE from the profile places the player in the shop window; AI clubs bid between 90 and 120% of his value and the offers land in OUTGOING, where you accept or reject them. RELEASE terminates the contract by paying half the remaining wages.
Loans
REQUEST LOAN brings a player over from another club for one season with the wage split down the middle; he returns to his club when the year closes. Only while a window is open, and the owner won't loan out his undisputed starters (and can still say no anyway).
Renewals
Only for contracts in their final year (the RENEWALS tab or the profile). The player asks for roughly a +20% raise over 3 years; the offer sits pending and he answers when you advance the matchday. Offer him less than he's asking and he refuses and loses morale; if he signs, he gains it. If the season ends without a renewal, he leaves on a free. Players over 34 in their final year announce their retirement and won't sign anything.
Pre-contracts (Bosman)
From day one of your game you can commit players at other clubs in their final year — for free: you offer wage and years and, if he accepts, he joins when the season closes. He demands a clear pay rise (20% over his renewal ask) and a club worthy of him. A maximum of 3 signed pre-contracts per season, and they take up a slot in next year's squad. A pre-contracted player can no longer be renewed, bought or loaned. And watch out: the AI hunts yours too — your high-level players in their final year are targets from day 1 (you'll find out from the news). Renew in time. Everything is tracked in OFFERS > PRE-CONTRACTS.
Shortlist, scout and transfer activity
- SHORTLIST: up to 20 players tracked with ADD TO SHORTLIST / REMOVE FROM SHORTLIST from the profile.
- SCOUT: requires hiring the staff member. Choose his search country (switching it discovers that league for SEARCH) and he finds 16-year-old youth players with hidden potential. PROMOTE moves them up to the first team; also from OFFERS > YOUTH PROMOTIONS.
- INS AND OUTS: the season's summary — arrivals and departures with origin, destination, type and fee, plus the totals spent and earned.
- Free agents: SIGN FOR FREE, wage and years only, even with the market closed. They ask for a wage in line with their value.
The market AI and difficulty
The market moves on its own: AI clubs sell their cast-offs, buy where they're limping, renew their own players drip by drip all season long and sign Bosmans. Their aggression depends on difficulty: on EASY they barely contest the market with you; on HARD they hunt your pending renewals with more appetite and can even steal a target from you: while your bid is still pending, a club with cash jumps ahead by paying over your head. Your offer dies rejected with the reason another club beat you to him and the signing makes the news. If you really want someone, close fast — or pay the clause.
💰 Finances
The club has a single CASH balance: signings, wages and building works come out of it, and everything you earn goes into it. The FINANCES screen sums up the season in two columns — SEASON INCOME and SEASON EXPENSES, grouped by concept — with the cash highlighted below (green if positive, red if not). From here you also sign the BROADCASTING RIGHTS and enter MERCHANDISING.
Income
- Gate receipts: every home match earns attendance × (ticket price + extras). Attendance starts from a base occupancy per division (55% in the 1st tier, 45% in the 2nd, 40% in the 3rd), climbs by up to 30 points with your league position, is multiplied by the price effect and by fan support (from ×0.9 to ×1.1), and derbies draw 15% more (stadium security adds 5% per level). It never exceeds capacity. Extras are per-spectator spending: a €0.20 base plus whatever parking, shops and toilets contribute, up to €1.50 a head.
- TV and sponsorship: every deal pays half a yearly fee on league matchday 1 and the other half on matchday 23. Each matchday brings 3 new OFFERS (at the BOARD screen and, for TV, also in FINANCES): more money over 1 year, standard over 2 or less money over 4, with figures that depend on your division, your reputation and the country's strength. Signing replaces the current deal (you lose its remaining years) and you can only sign once per season for each type. An expired deal pays nothing; if you sign after both instalments have already been collected, the half-year fee is paid out on the spot.
- Prize money: €30M for winning a top-flight league and €10M for the National Cup. In the Champions Cup, €3M for every tie won and €50M for the champion; in the Continental Cup, €1.5M per round and €20M for the champion.
- Sales: player transfers, youth player sales and merchandising sales.
Expenses
- Player wages: every matchday deducts the proportional share of the squad's annual wages (on loans, parent club and borrower pay half each).
- Staff wages: each employee costs €0.3M / €0.6M / €1.2M a year depending on level, also accrued per matchday.
- Stadium maintenance: €0.06M per matchday for every 10,000 seats — a giant stadium only pays for itself if it fills up.
- Building works, signings, the loan instalment and whatever WIN BONUS you set at the Board screen (€0 to €2M per win; it lifts morale, but it's paid out after every victory).
Bank loans
At the Board screen, in the BANK LOAN block: choose the AMOUNT (up to €60M) and the term in MATCHDAYS (10 to 40). Interest depends on difficulty — 5% on EASY, 10% on MEDIUM, 15% on HARD — and the financial advisor knocks 3 points off it. Only one loan can be active at a time; the instalment is deducted automatically every matchday until the debt is cleared.
Bankruptcy
Every matchday with the cash in the red ticks a counter up: when it hits the limit (10 straight matchdays on EASY, 6 on MEDIUM, 4 on HARD), the board acts. On EASY and MEDIUM it sells your most valuable player for you at 85% of his value; on HARD, it flat-out sacks you. On top of that, with the cash in the red you can't start building works. Getting back into the black resets the counter to zero.
Stadium: upgrades and ticket price
STADIUM UPGRADES offers 4 works sold in packages (1 to 4 per upgrade): Capacity (+5,000 seats, €6M, 16 matchdays per package), Parking (+5,000 spaces, €2M, 8 matchdays), Shops (+10, €1.5M, 6 matchdays) and Toilets (+25, €1M, 5 matchdays). START UPGRADE charges everything up front, can't be cancelled, only one work of each type can be in progress, and the upgrade activates when the countdown ends. Capacity is capped at 110,000.
The TICKET PRICE adjusts from €5 to €100: raising it earns more per seat but empties the stands, and dropping below your division's reference price (€30 in the 1st tier, €18 in the 2nd, €10 in the 3rd) can push attendance up by as much as an extra 30%. The sweet spot depends on your fanbase and your league position.
Merchandising
In MERCHANDISING you manufacture 5 items and sell them only on home matchdays: SHIRTS (made for €35, retailing at €90), SCARVES (€8 → €25), CAPS (€6 → €20), FLAGS (€5 → €15) and KEYRINGS (€2 → €8).
- Batch manufacturing: each item offers 3 batch buttons (1,000 / 5,000 / 20,000 units; keyrings, 5,000 / 20,000 / 50,000) with the cost pre-calculated. Volume brings the unit price down: −10% from 1,000 units, −20% from 5,000 and −35% from 20,000.
- Demand: at every home match, each item sells attendance × its demand percentage (shirts 8%, scarves 7%, caps 5%, flags 4%, keyrings 10%), multiplied by your stadium's shops (at 60 shops demand doubles) and by fan support. Each item's row shows you the ceiling: how many units you could sell with a full stadium — that's the scale to manufacture at.
- Stock: you sell at most what you've manufactured; whatever doesn't sell stays on the shelf for the next match and carries over from season to season. The screen shows your stock valued at sale price, what you've sold this season and a HISTORY with the latest movements (manufacturing in red, sales in green).
- The financial advisor improves the income from every sale (5% per level), just as she does with sponsorship.
The STADIUM block on the result screen
After every home match, the result screen includes a STADIUM block with the capacity, the attendance and the occupancy percentage, plus the matchday income (gate + merchandising shop). Away from home it doesn't appear: the takings belong to your opponent.
🏛️ The club and the dugout
The BOARD
The BOARD screen is where your job is on the line. Two CONFIDENCE bars (0–100): the BOARD one moves every league matchday by comparing your actual position with the expected one (a squad-level ranking within your division), capped at ±3 per matchday; losing the derby costs 3 and every matchday with the cash in the red costs 2. When the season closes, every objective achieved adds 15 and every one failed subtracts 15; a title adds 25. If confidence drops below 10 the sacking is instant; between 10 and 20 you get 5 matchdays to turn it around. On EASY there's no sacking during your first season. The FANS bar moves with arcade events and matchday heroics (a comeback, a last-minute goal) and feeds directly into gate receipts and merchandising.
- SEASON OBJECTIVES: "Finish in the top X" (the expected position plus a difficulty margin: EASY +4, MEDIUM +1, HARD −1: they demand more than your squad is worth) and "End the season out of the red". Meeting them also moves your manager reputation (+2/−3; a title +5; a sacking −5), and hitting the main one can bring offers from better clubs when the year ends.
- WIN BONUS: €0 to €2M (in steps of 0.1). Every win pays it out of the cash and gives the whole squad +2 morale.
- BROADCASTING RIGHTS and SPONSOR: 3 new offers arrive every matchday (more money over 1 year, balance over 2, less over 4, with ±10% variation). They pay out in two instalments per season. You can only sign once per season for each type, signing replaces the current deal (its remaining years are lost) and an expired deal brings in nothing until you sign.
- BANK LOAN: €5–60M over 10–40 matchdays, one active at a time; the instalment is deducted automatically every matchday. Interest by difficulty: 5% EASY, 10% MEDIUM, 15% HARD (the financial advisor makes it 3 points cheaper).
STAFF
Eight roles from level 0 to 3, hired and dismissed instantly (the − and + buttons). Wages per season by level: €0.3M / €0.6M / €1.2M, accrued matchday by matchday. You start with the scout at level 1. The actual effects per level:
- Physiotherapist: shortens injuries by 15% per level (at level 3, nearly half).
- Psychologist: cushions morale losses by 25% per level (up to 75%) and restores +1 morale per matchday to players below 50.
- Assistant manager: in the live match he suggests the most urgent substitution (flags anyone past 60 fatigue when a fresh replacement is available).
- Groundsman: +1% performance per level when playing at home and −20% injuries per level as hosts.
- Stadium security: +5% attendance per level at derbies.
- Financial advisor: +5% per level on sponsorship and merchandising income, and loans 3 points cheaper.
- Technical director: unlocks the opponent report (XI level and attribute averages); without him, the opponent screen shows "?".
- Scout: finds a 16-year-old youth player every 27–35 matchdays at level 1, 23–30 at level 2 and 18–24 at level 3 (and of higher quality the higher the level), with a maximum of 6 on the books; on top of that, the country he works in is discovered for SEARCH.
Management arcade events
Between matchdays at most one event can pop up (a little over one in three matchdays), from a catalogue of 30: PRESS CONFERENCE, DRESSING ROOM CRISIS, OFFER FOR YOUR STAR, LIGHTNING SWOOP (an auction), ACADEMY GEM, VIRUS IN THE DRESSING ROOM, THE SUPER-AGENT, BOARD ULTIMATUM… On EASY only the friendly ones appear; MEDIUM adds the negative ones and HARD sees them all, with extra weight on the nasty ones. No event repeats within roughly 8 matchdays. Some commit you to the future: bets on the next result, or the sponsor's challenge (win N of the next M matches, with a reward or a punishment).
Every event carries a 10–15 second timer, multiplied by difficulty (EASY ×1.3, MEDIUM ×1.0, HARD ×0.8) and, in PRO MANAGER mode, by an extra ×0.7. The option marked (DEFAULT) is highlighted and applies automatically when time runs out (with a tick-tock over the final 3 seconds). The timer can be turned off in Options, and your first event arrives with no rush and a full explanation. Once you decide, a CONSEQUENCES panel sums up the effects.
The live match
Scoreboard, clock, a 2D pitch and a chances feed. You control the speed (x1, x2, x4; the starting one is set in Options), the PAUSE, the TACTICS (all four sliders, mid-match) and the SUBS: up to 3, choosing between ON PITCH (with fatigue) and BENCH (with level). Hot events pause the match and each fires only once:
- HALF-TIME TALK (min 45): MOTIVATE is the right call when drawing, CALM THEM DOWN when winning and HAIRDRYER when losing. Getting it right boosts performance for the whole second half — the hairdryer gives the most, but one in five blows up in your face even when it was the correct choice. Getting it wrong costs you.
- COMEBACK TIME! (when losing by 2 or more after the break): ALL-OUT ATTACK (attack ×1.2 in exchange for defence ×0.75), HIGH PRESS (pressing maxed out and extra fatigue for the whole squad) or STICK TO THE PLAN. Trigger a plan and finish without losing: +15 morale and +10 fan confidence.
- PENALTY (from min 60, with a tight score): for you or against you, it's settled in the goalmouth mini-game.
- LAST MINUTE! (from min 84, with a tight score): you choose SHOOT or BALL INTO THE BOX and the bar mini-game begins. Succeed and it's a real goal by your best finisher (+10 morale, +5 fan confidence); fail and it's −5 morale.
The mini-games:
- The bar: a cursor sweeps back and forth; tap NOW! as it crosses the green zone. The zone's width grows with the player's attribute (shooting or finishing). If you don't tap within 6 seconds, it resolves wherever the cursor happens to be.
- The goalmouth (3×2): taking one, you pick one of 6 zones — the high ones are deadlier if the keeper can't reach them, but fly wide more often; if the keeper guesses your column, he almost always saves. The rival keeper learns your habits between matches: vary your corner. AUTO-RESOLVE leaves the attempt to the attributes. Facing one, you pick the side your keeper dives.
- LIGHTNING AUCTION: 3 rounds of 10 seconds; BID (+10%) or WITHDRAW (the default option). The rival has a hidden limit (between 120% and 145% of the player's value): if your bid tops it, the signing is yours.
- THE RONDO: 20 seconds tapping the player receiving the ball; 10 touches or more give the team +6 morale, 5–9 give +3 and fewer, +1.
The RESULT screen
After every match: the score (with penalties if the tie needed them), scorers with their minute, and three panels: side-by-side stats (possession, shots, shots on target, corners, fouls, yellow and red cards), the full match feed (goals, cards, injuries and substitutions; saves are grouped at the end by keeper) and OTHER RESULTS THIS MATCHDAY from your competition, with your league position underneath. If you played at home, the STADIUM panel is added: capacity, attendance with occupancy percentage and the day's income (gate + shop). CONTINUE takes you back to your office.
📅 The season and your career
Season structure
Every season opens with 4 weeks of PRE-SEASON with the summer window open and two friendlies (weeks 2 and 4) to run the team in with nothing at stake. Then the league kicks off: the global calendar has 46 matchday slots, and each league plays as many as its size dictates (38 with 20 teams, 46 with 24, 34 with 18) with rest weeks spread throughout. Cup rounds slot in between matchdays, and around the halfway mark (matchdays 23 to 27) the winter window opens.
The cups
- National Cup: 6 single-leg rounds spread across the season, with a preliminary phase for the minnows. Just like the real Copa del Rey, in every tie the lower-division club plays at home. No extra time: a draw goes straight to penalties. The winner takes €10M (a top-flight league champion also collects €30M in league prize money).
- CHAMPIONS CUP: 32 clubs, from the round of 32 to the final, single legs with a shoot-out if it's level. Every tie won pays €3M and the champion pockets an extra €50M: it's the game's jackpot. The top 2 of every 1st division qualify, plus a 3rd spot for the 8 strongest leagues.
- CONTINENTAL CUP: the second continental competition, another 32 clubs drawn from the next qualifiers in each league (3rd-4th; down to 5th in the big ones). Same format, smaller prizes: €1.5M per round and €20M for the champion. Saudi Arabia doesn't play continental cups.
Promotion, relegation and play-offs
Every country applies its real quotas. In most of them 2 go up and 2 go down; in Spain and England 2 are promoted automatically plus the winner of the 3rd-to-6th play-off (and 3 go down). The Spanish 3rd tier (2 groups) promotes each group's champion plus 2 more through the cross-group play-off from 2nd to 5th. Play-offs are played once the season closes, over two legs with the return at the better-placed side's home; if the aggregate ends level, the better regular-season finish goes through. Your country's ties and results appear on the END OF SEASON screen. Promotion adds 4 reputation points to the club; relegation takes them away.
End of season
The END OF SEASON screen sums up the champions, your position, the board's verdict (objective achieved or failed: ±15 confidence; each title +25), your squad's awards (top scorer and player of the season), promotions and relegations, retirements and expiring contracts at your club. Tap START PRE-SEASON and the whole world hands over the baton:
- Everyone turns a year older: young players grow towards their potential and veterans decline.
- Contracts tick down a year. Anyone left unrenewed walks for free; signed Bosman pre-contracts are executed and loanees return to their clubs.
- From age 34 players retire (with a probability that rises with age); anyone over 35 whose contract runs out retires outright — announcing it at the start of the season. Every retiree leaves an academy kid at his club, and if he was a superstar, an heir tipped to reach his level. The AI's academies produce youth players every summer and, if the world runs short of stars, generational talents are born at the big clubs.
- Fatigue, form, morale, suspensions and statistics reset for the new campaign.
Dynamic club reputation
Every club's reputation (1-99) is alive: winning a top-flight league adds 2, the National Cup 1, the Champions Cup 3 and the Continental Cup 2; finishing bottom of any league subtracts 1. On top of that, a gentle drift (up to ±2 per season) nudges each club towards its division's natural band: serial champions don't pile up at 99, and a newly promoted side gradually earns the prestige of its new tier over the years.
History, trophies and your reputation
From the Board screen you enter the MANAGER HISTORY (every season with club, division, position and your league and cup record) and the TROPHIES cabinet, with your career summary: seasons, titles and win percentage. It all travels with you even if you change clubs. Your manager reputation (1-99) rises with every title (+5) and objective achieved (+2), and falls when you miss objectives (−3) or get sacked (−5): job offers depend on it.
Sacking, job offers and retirement
You're sacked if board confidence drops below 10, if it spends 5 straight matchdays below 20 or if the club goes bankrupt (on EASY there's no sacking during your first season). The SACKED screen shows the reason, your career summary and the JOB OFFERS: up to 3 clubs of reputation close to yours, each with the objective its board will demand. With a low reputation, the phone may not ring at all. Your options:
- ACCEPT: your career continues at the new club with confidence at 50 and your history and trophies intact.
- WAIT FOR OFFERS (5 MATCHDAYS): you join the dole queue; after the wait, a humble 2nd-division club always calls.
- RETIRE: career over, with a final summary; the save stays on the list for browsing.
You don't need to be shown the door to seek a change of scenery: hit the season's objective and at the end of the season a JOB OFFER from a club better than yours may appear — tap TAKE THE JOB and make the leap, keeping everything you've built.